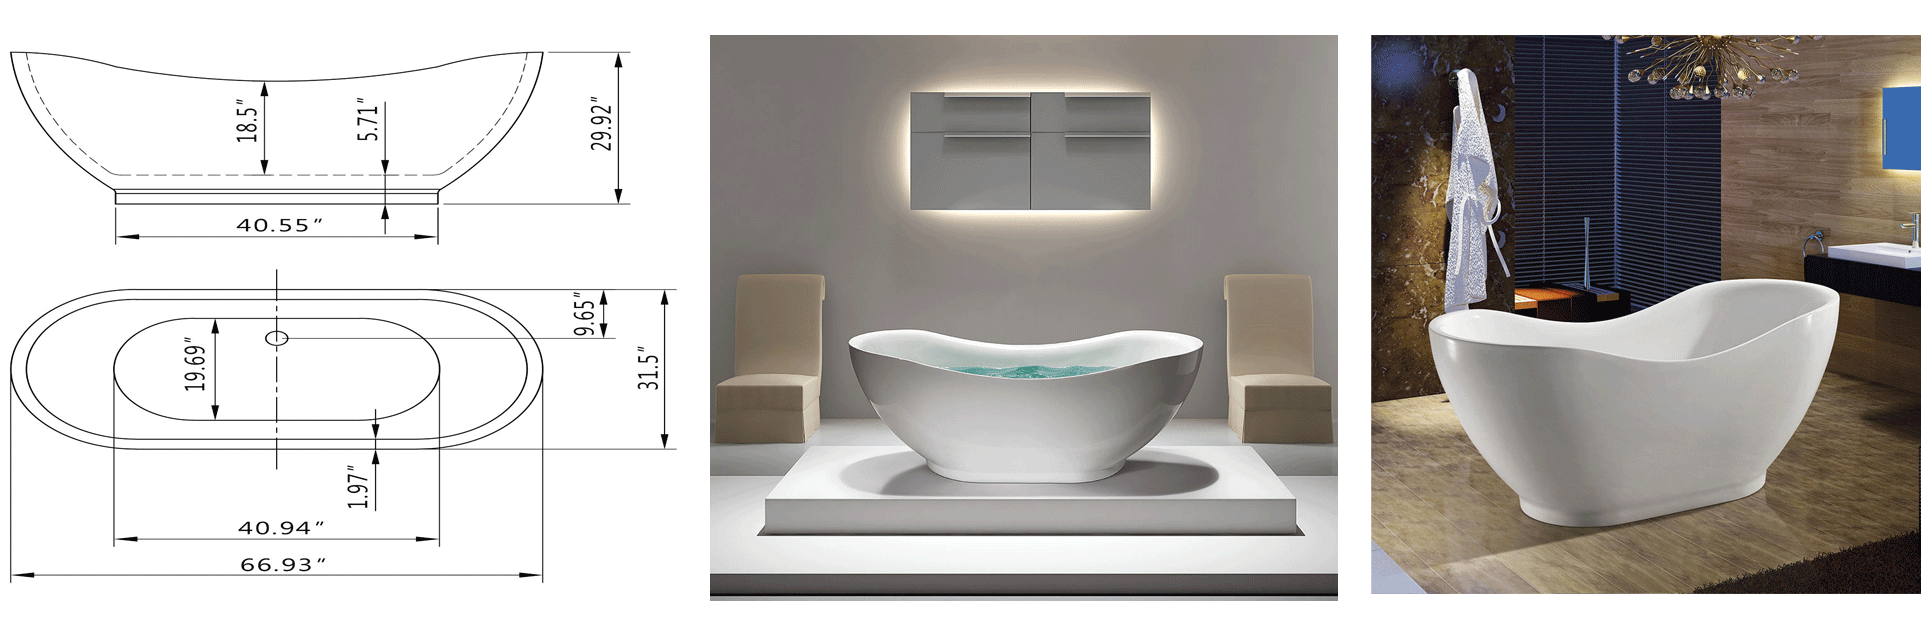
Installations Schematics for Fontana Freestanding Oval Bath Tub
1 min read
624 views
Installations Instruction For Schematics for Fontana Freestanding Oval Bath Tub
Related Posts:
Details Sedona Freestanding 71″ Square Bathroom Tub
Fontana Best Bathtubs
Links to Products – Top Bathtub Faucets
Installation Instructions Fontana Wall Mounted Bath…
110 Volt Hot Tub or 220 Volt Hot Tub?
What are the BEST Commercial Sensor Faucets &…
2024 Customer Review of Shower Mixer Valves
Top 5 Shower Panels To Buy In 2025
Do Automatic Water Faucets Actually Save Water?
Add Some Magic To Your Bathroom With Dark Bronze…
Who makes the BEST Touchless Bathroom Faucets
Best Shower Sets
Best High-Pressure Shower Heads
Shower Head Types
Plumbing Fixtures Revit Families
2024 Showerhead- Top Brands
The Worst Smart Shower System
The Shower Massage Tower Panel with Rain Shower Head
What are eco-friendly shower heads?
Reviews BathSelect Shower Sets
and measuring tapeand plumbing linesand re-seal if necessary.apply silicone sealant around the base of the tub where it meets the floor to prevent water leakageattach the waste pipe to the drain assemblycheck the tub’s dimensions and mark the desired location on the floor for proper positioningchecking for leaks or any issues with water pressure or flowclean up any excess debris or dust from the installation areaconnect the faucet and showerhead to the tub’s faucet assemblyconnect the hot and cold water supply lines to the faucetdraindrillensure the bathtub is level and make any adjustments to ensure proper stabilityensuring all components are connected tightly and sealed with plumber’s tape to avoid leaksensuring the water lines are properly connected and sealedensuring there is enough space for installation of the faucetensuring they are securely tightened to prevent leaksespecially if the tub has freestanding legs or basesgather all necessary tools including a pipe wrenchinspect the bathroom floor to ensure it is level and capable of supporting the weight of the freestanding tubinspect the tub periodically for any signs of wear or damageinstall any necessary additional components such as a hand shower or sprayerinstall the drain and overflow assemblyInstallation Schematics for Fontana Freestanding Oval Bath Tub: Turn off the water supply to the bathroom before starting the installationlevelmaking sure it aligns with the home’s existing plumbingmaking sure the hose is properly connected and the sprayer is positioned correctlyperform a final check to ensure the tub is fully operationalplumber’s tapeposition and install any required mounting hardware or supports to keep the tub stableposition the freestanding bathtub in the desired spotregularly maintain the tub by cleaning the drain and faucet components to prevent clogs and buildupremove any existing fixtures if replacing an old bathtubscrewdrivertest the water flow to the faucet and drainverify that the drain functions properly by filling the tub with water and ensuring it drains efficientlyverify that the faucet controls are installed and positioned for easy access and operationwith all components functioning smoothly
written by
Anellie understand the Art and Science of Home remodelling. She has been working in the industry since last 12 years with some of the nation’s top design firms and most-prominent clientele. Michelle's portfolio includes new constructions as well as high end remodelling assignments. She actively write about her work on her own blog and has been featured in various online publications and industry blogs.