Installing Instruction For New Bathroom Faucet
A new bathroom faucet can make all the difference in a powder room, half-bath or full bathroom. Bathroom faucets are an excellent do-it-yourself project that take some basic hand tools, a bit of patience and the ability to work under a sink. Learning how to install a new bathroom faucet is a simple and rewarding process, so let’s get to work. Installing a Faucet: Remove existing faucet. Remove the existing faucet and turn off the water
Remove the hot and cold water handles on your existing faucets. Many handles have a small plastic cover in the center. Use a knife to pry up the plastic center. Use a screwdriver to detach the handles. Lift the handle straight up. Use an adjustable wrench to loosen and remove the nut surrounding the stem of the hot and cold water mechanisms.
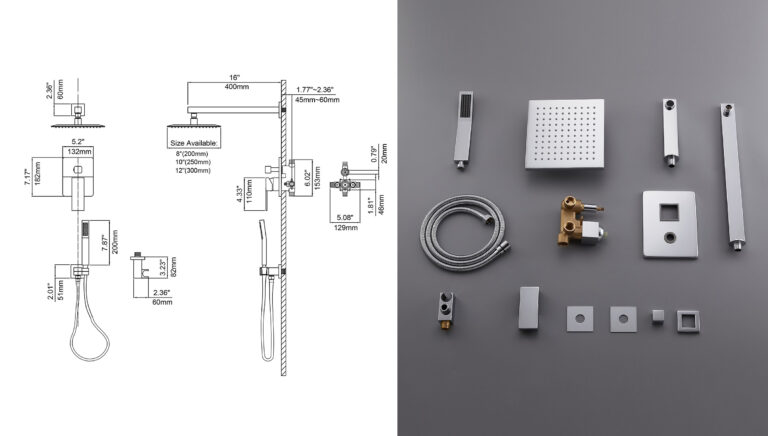
How to Install Bathroom Faucet
Position a bucket below the handles to catch water. Use an under-sink wrench to remove the nut surrounding the stem of hot and cold water mechanism from below if needed. Detach the drain lifter. Detach the drain lifter and remove the rod. Carefully save the under-sink connector or strap.
Remove the water supply lines. Use a wrench to remove the nuts surrounding the water supply lines for the hot and cold water mechanisms. Save the compression fittings and nuts. If there are no compression-fitting nuts, position a bucket to catch water and use a hacksaw to cut supply pipes. Have a cloth or rag ready to mop up water. Place the existing faucet in a bucket. Place the existing faucet in a bucket and allow it to drain. Mop up any water from the removal process. Set aside all nuts, compression rings and other fittings.
Install the new faucet. Put the new faucet in place and tighten the fittings by hand. Adjust the location and then tighten the fittings. Attach the new drain lifter. Reuse the old connecting rod or strap. Make connection to the water supply. Align the hot and cold water mechanisms with the water supply lines.
Slip on the nut; then slip on the compression fitting. Use plumber’s tape or brush on plumber?s seal on the threads of the water supply connection. Slide the compression fitting down to the end of the supply tube and the nut over the threaded connection by hand; and then tighten with a wrench.
Test it out. Turn on the water and test. Turn on the water supply slowly, testing the cold water first. Check each connection. Wait for slow drips, if any. Tighten lightly, as over-tightening can damage the faucet parts and cause leaks. Run the water through the mechanisms and clear small bits left over from manufacturing process and then pat yourself on the back. You’re finished!
BathSelect Faucet Brand
- BathSelect LED Faucets: Modern faucets with integrated LED lighting for a stylish touch.
- BathSelect Touchless Faucets: Motion-sensing technology for hygienic, hands-free operation.
- BathSelect Smart Faucets: Advanced smart home integration with customizable features and controls.
- BathSelect Brushed Nickel Faucets: Elegant, durable finish that resists fingerprints and water spots.
- BathSelect Chrome Faucets: Classic, shiny finish for a timeless, polished look.
- BathSelect Waterfall Faucets: Unique faucets with wide, flowing streams of water for luxury.
- BathSelect Thermostatic Faucets: Temperature control features for consistent, safe water temperature.
- BathSelect Widespread Faucets: Separate handles and spout for a sophisticated, customizable look.
- BathSelect Commercial Faucets: Heavy-duty, durable faucets designed for high-traffic areas.
- BathSelect Bidet Faucets: Specialized faucets designed for hygiene and comfort in bidet systems.