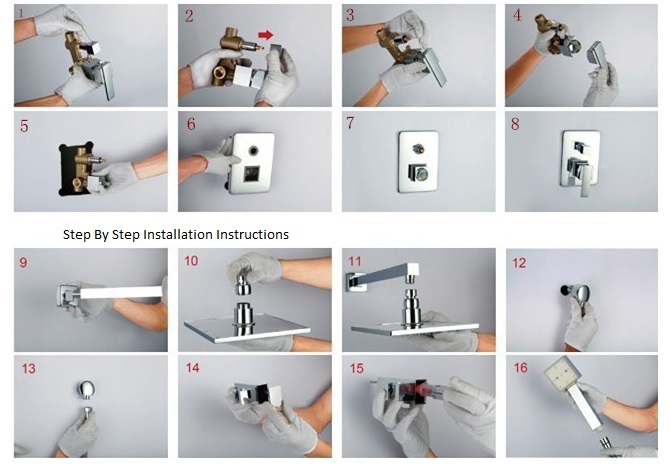
Shower Sets Facts & Installations
How to Install a Shower
Installing a shower can be an exciting and rewarding project that enhances the functionality and appeal of your bathroom. Whether you’re replacing an old shower or starting from scratch, knowing how to install a shower properly is crucial to ensure a successful and leak-free installation. This article will walk you through the step-by-step process, covering essential aspects such as preparing the space, installing the shower pan or base, connecting the plumbing, installing the shower walls, and finishing touches. By following these instructions, you’ll gain the knowledge and confidence to tackle this home improvement project and create a refreshing and enjoyable showering experience.
 Waterfall Rainfall LED Shower Head
 Large Recessed Digital Display Shower Head
General shower head installation
These instructions for how to install a shower head are meant as a general guideline. Always check the package for instructions for your particular product.
- Remove your existing shower head
- Clean the shower arm supply pipe threads
- If a gasket is not included, wrap the shower arm supply pipe threads with Teflon Tape
- Screw new shower head onto the shower arm supply pipe threads clockwise and hand tighten
How to fit Shower Head Arm
Shower head arms are pretty easy to install just make sure the thread is 1/2″ US standard and all you would need is a simple twist to the other side connection be it the shower hose or other fixture.
For example, replacing a shower head arm is a relatively straightforward process. To change the shower arm, start by removing the old one. Use a wrench to loosen and unscrew the shower arm from the pipe in the wall. If necessary, apply penetrating oil to help loosen stubborn connections. Once the old arm is removed, clean the threaded end of the pipe to ensure a proper seal. Take the new shower arm and wrap plumber’s tape around the threads to prevent leaks. Carefully thread the new arm onto the pipe, ensuring it is tight but not over-tightened. If the arm doesn’t align with your desired angle, you can use an adjustable wrench to tighten or loosen it. To install a shower head with a hose, simply attach the hose to the shower head using the provided connections. Finally, to finish the shower head installation secure the shower head flange by tightening it onto the arm, making sure it is flush against the wall. With these steps, you can easily replace a shower arm and flange, ensuring a secure and functional showerhead installation.
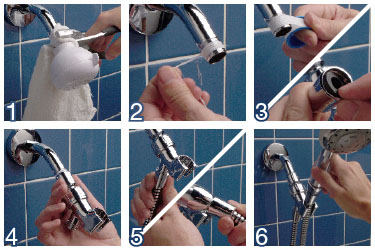
General hand held shower head set installation
These instructions are meant as a general guideline. Always check the package for instructions for your particular product.
- Remove your existing shower head
- Clean the shower arm supply pipe threads
- If a gasket is not included, wrap the shower arm supply pipe threads with Teflon Tape . Insert gaskets into hose ends*
- Screw the hand held shower mount onto the shower arm supply pipe threads
- Connect the shower hose to the mount and to the hand held shower
- Place the hand held shower into its mount
Some handheld shower heads have a rubber O-ring on the threading at the base of the handset. If this is the case, it is not necessary to place a rubber gasket in the end of the hose that will connect to the hand shower. The combination of an O-ring and a gasket sometimes will prevent a water-tight seal from forming and the handheld shower head will not have a leak-free installation
Installing Shower Arms with Female Threads
Shower arms with female threads, are slightly more complicated to install than ones with male threading. Hi-Lo arms feature easy installation by attaching directly to your existing shower arm and permanent installation by replacing it. A 1/2 inch pipe nipple, not included, is required for permanent installation of shower arms in the United States.
Female-Threaded Standard Shower Arm Installation Instructions:
- Remove your existing shower arm flange
- Mark a line on the existing shower arm where it meets the wall.
- Unscrew the existing shower arm
- Measure the length from the end of the shower arm to the line marked on it in Step 2.
- Screw on a 1/2 inch pipe nipple that is 3/4 inch longer than the length measured in Step 4.
- Wrap pipe nipple with Teflon tape
- Screw female-threaded shower arm onto pipe nipple.
- Thread flange over shower arm
- Install shower head
Female-Threaded Swan Shower Arm and Hi-Lo Shower Arm Installation Instructions:
- Remove your existing shower arm flange
- Mark a line on the existing shower arm where it meets the wall.
- Unscrew the existing shower arm
- Measure the length from the end of the shower arm to the line marked on it in Step 2
- Screw on a 1/2 inch pipe nipple that is 3/4 inch longer than the length measured in Step 4
- Wrap pipe nipple with Teflon tape
- Place flange over pipe nipple
- Install shower arm on pipe nipple. Be sure to thread through the flange for secure fit.
- Install shower head
Designer Supply Elbow Installation Instructions:
- Remove your existing shower arm flange
- Mark a line on the existing shower arm where it meets the wall.
- Unscrew the existing shower arm
- Measure the length from the end of the shower arm to the line marked on it in Step 2
- Screw on a 1/2 inch pipe nipple that is 3/4 inch longer than the length measured in Step 4
- Wrap pipe nipple with Teflon tape
- Place flange over pipe nipple
- Install Designer Supply Elbow by screwing (clockwise) onto pipe nipple.
- Place cover over supply elbow and attach hose
Supply Elbow with Flange Installation Instructions:
- Remove your existing shower arm flange
- Mark a line on the existing shower arm where it meets the wall.
- Unscrew the existing shower arm
- Measure the length from the end of the shower arm to the line marked on it in Step 2
- Screw on a 1/2 inch pipe nipple that is 3/4 inch longer than the length measured in Step 4
- Wrap pipe nipple with Teflon tape
- Place flange over pipe nipple
- Install Supply Elbow by screwing (clockwise) onto pipe nipple.
- Attach hose
Supply Mount with Flange Installation Instructions:
- Remove your existing shower arm flange
- Mark a line on the existing shower arm where it meets the wall.
- Unscrew the existing shower arm
- Measure the length from the end of the shower arm to the line marked on it in Step 2
- Screw on a 1/2 inch pipe nipple that is 3/4 inch longer than the length measured in Step 4
- Wrap pipe nipple with Teflon tape
- Place flange over pipe nipple
- Install Supply Elbow by screwing (clockwise) onto pipe nipple.
- Attach hose and place swivel connector with handheld shower head on pin
Also you can check the following links for more details:
Shower arm installation
How to install a shower head with handheld
Shower head installation
If you are looking for the best high pressure rain shower head, you can enjoy the benefits of a powerful and rejuvenating shower every day! You want to browse the our website selections for shower heads, and explore some of our best models.
Simple steps to install shower heads, hand held shower head sets and shower accessories
shower massage panels, LED showers, shower panel, automatic sensor faucets, massaging shower heads, faucets to shower sets, and more.
 WaterfallRainfall Shower Head


