Steam Generator Installations

Installations Instructions For Steam Generator
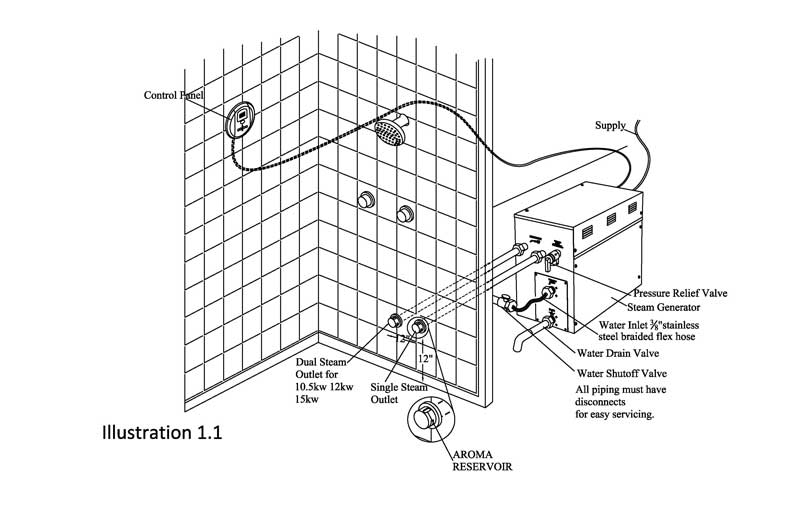
Congrats on your purchase for a new steam generator. And now you are looking for the installations instructions for steam generator that you bought. The Steam Generator operates with one or two controls appropriately located inside and/or outside the steam room. It’s small enough in size to be tucked away using very little space in a vanity, closet, basement, or an insulated attic, but large enough in capacity to provide steam for most residential baths. The Steam Generator comes factory assembled, carefully wired and tested.
1. Pre-Installation
Proper electrical supply (208 or 240 Volt): See rating label on Steam Generator and chart on the back page. Determine the proper size of wire, voltage, amperage, and phase for the Steam Generator. Only UL rated 90°C wire can be used.
- Dedicated over current protection device, such as an in-line fuse/circuit breaker required: Fuse/circuit breaker to be installed must be sized in accordance with the chart on the back page. Do NOT install a GFI (Ground Fault Interrupter) to this equipment (per article 210-8 in the National Electric Code).
- Route power supply cable to the location where the Steam Generator will be installed (before walls are closed).
2. Electrical Rough-in
- At this time read through the installation instructions for the selected control(s).
- Route appropriate power cable to the location the Steam Generator will be installed. If the receptacle is desired, mount the box for the receptacle near the location of the Steam Generator.
NOTE The plug and receptacle require a rating of no less than 250V and proper amperage. Refer to chart on page 4 for amperage rating. After the walls are complete, the Steam Generator and Control can be wired.
3. Steam Generator Electrical Installation
WARNING: All power to the Steam Generator must be turned off.
- Remove the two screws holding the electrical access cover and remove the cover.
- Locate the supply line knockout. Mount proper strain relief into knockout hole
- Strip back power cable’s outer insulation jacket eight inches and insert into Steam Generator. Strip back insulation ½” from the three (3) incoming wires (two power and one ground).
- Connect the incoming ground wire to floating green pigtail labeled “GND.” CAUTION: Be sure the ground wire does not come in contact with a live electrical part.
Connect incoming power to floating black pigtail leads labeled “L1” and “L2”
- The Steam Generator is ready for operation once the installation of the controls is completed (refer to separate Installation and Operating Instructions)

Related Posts:
 Installing Touchless Bathroom Faucets
 Hands-Free Faucet
 Jetted Shower System – How To – Pros/Cons
 FAQ Touchless Bathroom Faucets
 Smart Showers Fashion Trends for 2023
 Important Installation Instructions For Bathroom Faucets
 Installation instructions ADA commercial motion…
 110 Volt Hot Tub or 220 Volt Hot Tub?
 Shower Panel Installations
 Best Shower Heads 2023
 Water Powered Sensor Faucets
 Why LED Shower Head Lights Not Working? We have the…
 5 Benefits Of Touchless Bathroom Faucets
 Best Motion Sensor Bathroom Faucets Review –…
 Complete Installation Guide of Wall Mount 3 Piece…
 Give A Sensational Update To Your Bathroom Fixtures
 Features to Consider BathSelect Touchless Bathroom Faucets
 Waterfall – Large Shower Head
 Best Shower Design
 Installation Instructions for Temperature Sensor…


